- Direct links to items in the course that are relevant to the operational portion of the course - information like the Syllabus, Student Time (Office Hours), Due Dates
- Links to resources that students might need in the course like the online textbook, third party software, YouTube playlists
- College resources like tutoring, counseling center, the writing center, and the Technology HelpDesk
Most of the items listed above don't really belong in content modules; these resources should be accessible from the landing page of the course. By default, this widget is not on the homepage of my course (at my institution). That's easy to fix!
Before we get started, you should know that the User Links widget has two primary uses. Instructors can curate links for students and students can add links that they use often. Any link that you add through Course Admin will appear to all students in your course (this is a course-level tool), but any links students add will appear only to them, but in any course where the widget is visible. Note that you can add your own links that are visible to only you - so make sure you continue reading.
Here's the end result:
Note that students will see all the links under "User Links" but they will not see the links under "My Links" - that is a personal link (more on that later).
HOW TO ADD THE USER LINKS WIDGET
To add the User Links widget, go to the homepage in your course and click on the meatball menu (the three horizontal dots) at the bottom of the page and click on "Edit this Homepage". Note that if you do not have this option, it is probably because you cannot modify the default homepage and you'll have to make your own.
Note that in this screen you can drag and drop widgets to different locations in the panel as well as different panels.
ADDING LINKS TO THE WIDGET
The right way to add links to this widget is to go through Course Admin. Look for the link that says "Links". Once you are there, you'll have to add categories. In my example, I have a category called "Course Information" and another one called "College Resources". After you make the categories, you can use the downward chevron next to each category and make a link.
You can create a link to any external resource just by clicking on "New Link". But there is a small trick to adding a link to content that already exists in your course.
HOW TO CREATE A LINK TO CONTENT IN BRIGHTSPACE
When you are in the screen to add a link, enter the text you'd like for the link in the "Title" field. But instead of entering an address in the "URL" field, check out the little tiny icon of a chain link with a lightning bolt next to it. That's called a "Quicklink".
Once you've clicked on the Quicklink icon, you'll launch a "picker" that lets you choose specific Brightspace content (Announcements, Discussions, Content, etc.).
After you've curated your link, save your changes and exit!
HOW TO ADD PERSONAL LINKS
It might be the case that you'd like to add personal links (visible only to you) to your User Links widget. Check out the instructions below - and show your students how to do this! Any links added this way will be seen only by the person adding them and will be available in any class where the User Links widget is visible.
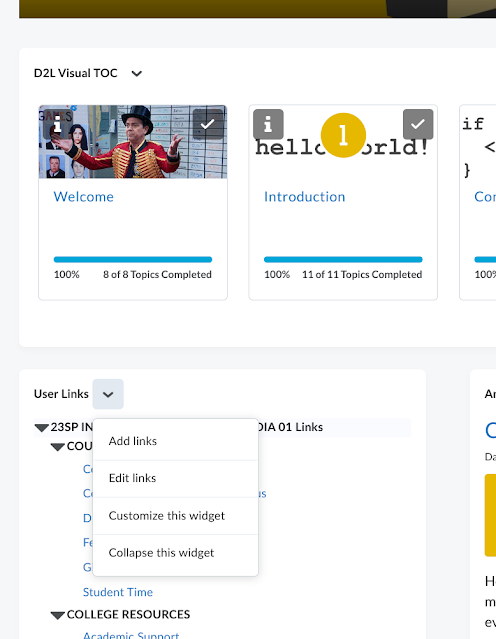
From the homepage, use the downward chevron next to "User Links" in the widget and choose "Add links". You'll be brought to a new screen where you can enter the text for the hyperlink as well as the URL.
I think this widget is a great place to store the documents, rules, policies, and minutia that students might need. The ability to link to internal content is really slick - most of the links in my User Links widget point to content already in the course; this is just a good way to aggregate all the important content in one spot.


